Tuesday, June 21, 2011

Renting Movies on iTunes for Plane Rides

iTunes movie rentals are the best. At $2.99, a movie rental is much cheaper than movie purchases ($9.99/film), and they help kill time on long trips. But a real stumper is whether or not these babies can play without WiFi. Nobody wants to spend ten dollars renting movies she's excited to see, experience the hustle and bustle of airport check-in and security, and then find that the movies don't play on the airplane. That, my friends, would suck big time. So the real question is--can iTunes movie rentals play on airplanes?

This is a topic I've been curious about for a very long time, and I found no clear answer on the internet (much like the issue about embedding multiple videos in a tumblr post. Clear here for my step-by-step guide on how to do so.) There are more than enough posts initiating discussion, but there are very few that give a straight answer. And so fellow readers, I set out to investigate, and I come back with a clear answer:

Yes, if you rent a movie on iTunes using your home wireless, you can in fact play this movie on the airplane (where there is no wireless).

If you read enough online discussions and forums, you'll find that people's main worry is whether iTunes needs to talk to a server to initiate playing the video. Many posited that the rental had to be played *first* using a WiFi connection; once 'play' is clicked for the first time, the movie expires after 24 hours.

With this in mind, I did a test at home before I spent my six dollars on two rentals. Where could I find a cheap rental? On the iTunes Movie page, I was delighted to find a '99 cents Movie Rentals' section. Perfect.

I rented the movie directly from my iPad's iTunes. Downloading a Standard Definition movie took around half an hour. After it had finished downloading, I turned off my wireless. Time for the moment of truth: would the movie play without WiFi? Yes! It did!

Here are screenshots as proof for all those hard-evidence seeking people.

This is my trial run at home.
After downloading the movie rental, the film appears in Videos under Rentals. 
Immediately, I turn off WiFi to simulate a plane scenario. 

Without WiFi, I am able to start playing the film.

As proof that there was really no WiFi, my internet browser did not work. 
More confirmation that WiFi was off when I started to play the movie.

Yup, the movie plays without WiFi! Success!
I repeat the same set of steps with another film, Finding Neverland, and find similar results:
I downloaded the film using my apartment's WiFi. I turn off WiFi to simulate plane settings.

With no WiFi in sight, the movie is able to start the 24 hour rental period. 
Confirmation that there in fact no WiFi when I initiated my rental period. 

I was overjoyed by the results! Confident from my success, I proceeded to download two movie rentals for my upcoming flight: Finding Neverland and Husbands and Wives. I'm proud to say that both played just fine on the airplane. However, I'd like to note the following: given my tendency to be overcautious and the abundance of naysayers on the internet, I had decided to start my 24 hour window this morning at my apartment (just in case). It was really no trouble--all I had to do was press play and then pause for my two rentals. I think though, this additional step had no influence on the results. Next time I fly, look forward to an update about this.

Conclusion: Yes, movies rented on iTunes can be played on an airplane without WiFi access. Starting the movie to initiate the 24 hr rental period does not require WiFi, but if it can be done beforehand with WiFi, it wouldn't hurt.

Monday, June 20, 2011

How to set up Disqus Comments in Blogger

Have a blog (or two or three?). Disqus is a free online service that easily manages your site's comments. Disqus features include:

[1] Compatible with multiple sites such as Blogger, Wordpress, and tumblr.
[2] Compiles the comments history on your disqus site.
[3] Allows for moderation of comments via email. When comments are made, you receive an email that shows the user and comment. If you reply with 'approve', the comment gets posted. If you reply with 'delete', the post gets deleted. If you want to post a reply to the comment, you simply reply to the email with your comment, which Disqus will post. All without having to visit a third party site! It's great!
[4] Nice aesthetics.
    [A] You can set up default icons for your users. This is a huge plus. Those ugly gray silhouette icons mar even the cleanest of site layouts.
    [B] The appearance of comments looks very nice. Each comment gets its own rectangular block.

If any of this interests you, read on!

Set up a disqus account. 
[1] Visit www.disqus.com. Click on Sign up and enter the appropriate information to create your free account.


Add your site to your Disqus account
[1] Go to your Dashboard by clicking on the Dashboard link at the top of the page. On the left under Your sites, click on the +Add button.

[2] Type in your site's information. Click Continue

Customize Your Disqus Account
[1] Set up spam protection using the free web-based service Akismet. After you typed in your site's information on disqus, you should see the following screen:


[2] Click on the Akismet icon. Visit www.akismet.com to set up your free spam-protection account. Click on Sign up for Akismet.

[3] Select Personal site (Akismet is free for personal sites). 

[4] Type in the appropriate form information. **Make sure to move the slider under What is Akismet worth to you? to $0.00/yr. Don't be discouraged by the frowny face. Click Continue

You will receive a confirmation that your Akismet account is set up.

[5] Check your email for the Akismet API key that you will enter on your Disqus page. Click Continue.

Type in the API key here on your Disqus Dashboard.

[6] Decide on your moderation settings. After you've set up your Disqus account, you can now customize your page. Moderation means that comments must be approved by you, the administrator, before they can be published. Under the Settings tab and the Moderation heading, you can either Enable or Disable moderation. For those who are interested in moderating, I recommend applying your settings to From all commenters.


[7] Change the settings for who can post comments. There are three options: anyone, registered only, and registered only with email. Like most people, I avoid extra online registrations as much as possible. Keeping my audience in mind, I chose to allow Anyone to comment. This is good for both me (more visitors! more comments!) and good for the users (no registrations! no new username and password!). Save new settings.


[8] Set up a default icon for all users. Under the Settings tab, in the Appearance heading, upload a new file to the Default avatar. I like having this option because I think those gray default silhouette icons are too plain and boring. Your default avatar can be simple! I made mine in Microsoft Powerpoint using the Shapes tools. I then took a screenshot clip of my icon and saved it as a .png file, which I then uploaded to the Disqus site. Remember to Save your changes.


Install Disqus on Blogger
(Disqus can be installed on other sites, but I am more familiar with Blogger, so I will provide Blogger-specific instructions).
[1] On the Disqus site, go to the Install tab, and select Blogger.

[2] Read the instructions. Click on the Add site 'Yoursitename here' to Blogger button. You will be directed to a Blogger-based link. Choose Add widget.


After you've added your Widget, you should see Disqus for Yourblognamehere show up on your Blogger Dashboard page. It will appear in the Design tab under Page elements on the right hand side.

[3] Turn off Google's own comments. After you've installed Disqus, there's no need to have two sets of Comments on your page.

Go to your Blogger Dashboard. Under the Settings tab, go to the Comments section. Choose to Hide comments. Save changes.

When you're done, at the bottom of each post, you will see the following setup for comments:
When you have more comments, it will resemble this: 
Woohoo! You've successfully set up Disqus for your website. You can now manage comments with the greatest of ease, and visitors will be impressed by its simple and sleek look. 

This is 'What the tech?!' signing off. 

Test

test

Sunday, June 19, 2011

How to Publicize Your Blog

In this new age of 'social media,' you need to be on multiple platforms and interfaces to maximize your audience base. Back when I started this blog a few months ago, I was interested in how to get my site 'out there.' After a couple hours of research and some trial-and-error fun times, I managed to customize my site in the following ways:

1) Allow for email subscription for interested audience members
2) Create automated tweets announcing new posts
3) Establish an RSS feed that people can subscribe to

If those sound like things you're interested in, read on for some detailled how-to's!

[0] Set up a blog
First, make a blog. My guide will be for Blogger-based sites, but I imagine you can tweak things minorly for other blogs such as Wordpress, etc.

Go to www.blogger.com and 'create new account'.

[1] Create a feed
In order to set up email notifications and twitter updates, you need a feed. 

Go to feedburner.google.com. Log in with the Google username and password associated with your blog.

You should see the following screen:


Initially, you will have no feed names appearing under feed title. In order to establish your feed, type in your blog website name into the line for your blog or feed address, and then click Next. For example, you would type in:

http://username.blogspot.com


You will next see the following window. Select the Testing-atom radio button. Click Next.


 You will now see the following window:


You can change your Feed Title to what you would like, and you can also change your feed address. Initially, it may look like: blogspot/wHidE , but you can change the last portion to something else so it could appear as blogspot/yourtitlehere.

Click Next. You will see the following screen:


Voila! You have established a feed address. Click Skip directly to feed management.


[2] Establish email subscriptions:
By setting up this subscription service, viewers will be able to receive daily email updates provided that you have updated your site on that particular day. All subscriptions will be sent from noreply@blogger.com. You don't have to worry about inadvertently sharing your personal email. 

After you've established your feed, you will see your blog represented on your feedburner.google.com site.


[2A] Turning on email subscription features
Under the 'Publicize' tab, you'll click on the 'Email subscriptions' heading. Click on Activate.


You will now be directed to the Subscription management subheading. The window will look as follows:


It is on this page that you will be able to  'View subscriber details'. You can see the emails of your subscribers, and you will be able to deactivate or delete these emails as desired. Currently, since you have just established your subscriptions, you will not have any subscribers listed at the bottom of the page.

[2B] Personalizing your message to subscribers
If you'd like to customize your 'thank you for subscribing message' (I did!), click on the Communication Preferences under the Email Subscriptions heading in the Publicize tab. You will see the following screen:


In this window, you can change the Confirmation Email Subject (the subject of the email sent to new subscribers) and Confirmation Email Body (the message that will be sent to new subscribers). 

On this page, you will also be able to change the email 'from' address. By default, feedburner puts in your personal email. If you'd like, you can change it to noreply@blogger.com. 

After making your changes, click Save

[2C] Set up a subscription email delivery time
In the Publicize tab, under the Email subscriptions heading, you will find the Delivery Options subheading. Here, you will be able to set the time that subscribers receive an email notifying them about the changes in your site. 


[2D] Add the email subscription widget to your blog. 
Think of widgets as little gadgets on your site that are pre-made for you and your users. Google provides many different widgets for its bloggers. To access this widget, do the following:

Go to www.blogger.com. Log in. You will be sent to the Dashboard, which is basically the control room for your site. Here, you can change the visual aspects, add widgets, make new posts, etc. Click on the Design link. 

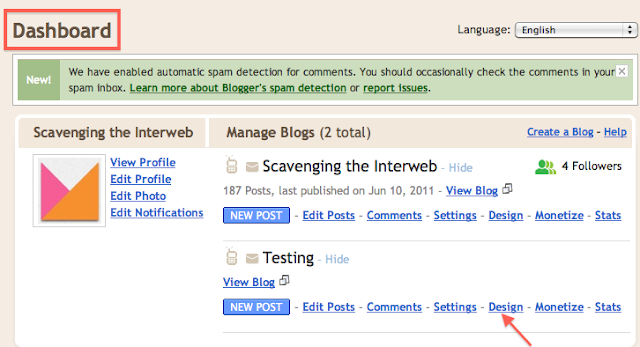
Your dashboard (actually, mine in this case).

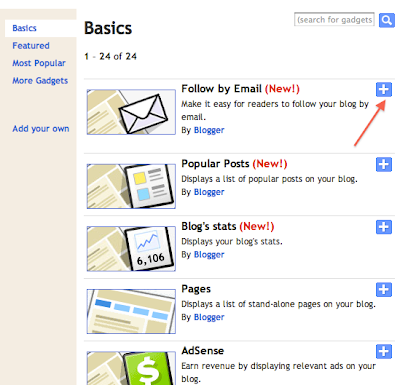
After clicking on Design, you will see the following. Click on the Add a Gadget link. You will see the following window pop up.  

Adjacent to the Follow by Email gadget description, there is a button. Click on it. If you wish, you may change the name of the email gadget. Finally, click Save
After clicking on 'Add a gadget,' you'll see this window.

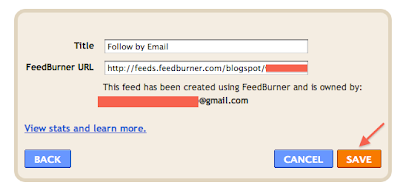
After deciding upon your gadget title, click on 'save.' 

You should now see the Email gadget appear on your Dashboard's Design page. 
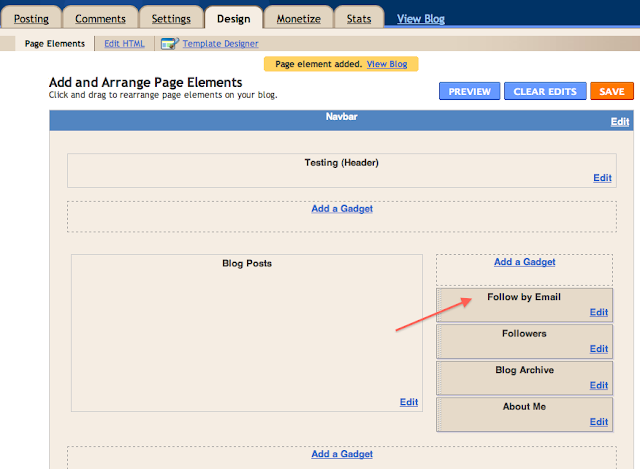
Ta-da! The Follow By Email gadget is now officially a part of your blog. 

[3] Announce new posts through automated twitter updates. 
Go to feedburner.google.com. 
Log in if you aren't logged in already. 
Under the Publicize tab, select the Socialize heading. 
Click on the Add a twitter account button, and enter the appropriate information. 


You can also make each automated tweet start with a phrase of your choosing, such as 'New post!' Type the desired phrase in the Additional text box. 


Below is an example of what posts with Additional text look like:


At the bottom of the page, click on Activate


In order to finalize the connection between Blogger and Twitter, you will need to approve this action via the Twitter site. After entering your twitter information, you will be presented with a link that will give you the screen depicted below. Click on Authorize App


To confirm that the approval has occurred, you can go to www.twitter.com and log into your account. On the top hand corner of your window, click on the little arrow to the right of your username, and select  Settings. 


In the settings page, click on the Applications tab. You should see that Google by Google, Inc. appears in the list. Its presence means the connection between your twitter and blogger accounts was successful. If at any time you decide to halt the Blogger updates via twitter, simply click on Revoke Access


The final step involves activating PingShot, a feedburner service that ensures the most frequent communication between your blog and twitter account. PingShot will keep your update tweets as recent as possible. 

Back at feedburner.google.com, under the Publicize tab, click on the PingShot heading. Click on Activate.

Note: If you ever feel that the feed is not updating as often as you'd like. Simply visit: 

Type in your site name, and then click Ping Feedburner. After you've clicked the button, bookmark this new page; any time you want to re-sync your feed, simply click on this bookmark. The URL for the bookmark should look something like this: 

http://feedburner.google.com/fb/a/pingSubmit?bloglink=http%RandomNumbers%yourwebsite.com

Now, you're all set. You have just successfully navigated the choppy how-to-integrate-social-media waters. Congratulations!